Garrattfan's Modelrailroading Pages

E41
Restoration of a Märklin E41
- Introduction
- Dutch Garratt LTM 51 in 1:87
- BR 52 2006
- Fairlie Merddin Emrys in 7mm (Painting)
- SBB C5/6 (wheel flange turning)
- Construction methods
- Painting wheels
- Blackening
- More...
- NBDS 118 2-8-0
- Dutch Class 5000 (ex-WD)
- Dutch Class 4300 (ex-WD)

- Dutch Class 8600 0-6-0
- NSWGR AD60
- NS 6200 2-8-2
- SHM 26 tram loco 0-4-0
- BR 99 Saxon VI K
.jpg)
- SBB Ae 3/6 II
- NGG 16 Garratt
- Dutch Ry 7005 4-4-0
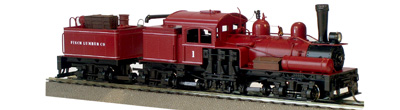
- MDC 3tr Shay
- E41 (Märklin 3034)
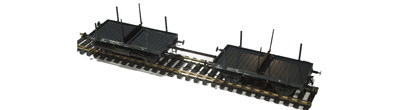
- Flat cars Dutch Ry
- BR 99 Saxon VIK for a friend
- Broad gauge rail
- BR 43/044
- VW Bus
- EM-1
- Elf tank car
- Regauging Bemo car
- Birthday present
- My fastest project ever

- Dutch Ry 7851

- Reihe U

- BR 98 "Glaskasten"

- Brienz Rothorn Bahn

- Dutch NCS 7-8 tramloco
- Dutch Class 3300 0-6-0
- Dutch Class 3700 2-6-0

- Dutch Class 3900 2-6-0 (new kit)

- Dutch Class 3900 2-6-0 (rebuild)
- Dutch Class 4300, ex-WD 2-8-0
- Dutch Class 5500 4-4-2
- Dutch Class 6000 4-6-4
- Dutch Class 6300 4-8-4
- Dutch Class 9500 0-10-0
- Dutch Garratt LTM 51 in 1:43.5
- SAR GCA Garratt
- SAR GMAM Garratt (kit)
- SAR GMAM Garratt (rebuild)
- LMS Garratt
- Tasmanian K1
- Bachmann On30 Shay conversion

- MDC Shay (pre-1900)
- Keystone Shay (pre-1900)
- Bachmann Shay
- Bagnall 3024 "Monarch"
- Brigadelok Klien Lindner

- UK LNER C2
- Diorama Brig
Current projects
Projects awaiting completion
Modeling Tips (recent)
Completed projects (order of completion)
Completed small work
Unfinished business
Project in store
Dutch locomotives
Project in store
Garratts
Project in store
Other articulateds
Project in store
Various
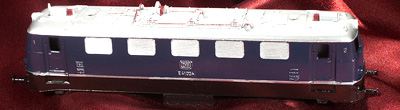
I guess you all have one or more models that fell victim to one of your experiments. So had a friend of mine. He had a E41 from Märklin (number 3034). In his teenage years he had "improved" it by painting it in different colors. And now, two decades or so later, he felt sorry about it. Of course there's virtually nothing that can undo the harm done. But I offered to use the body as a practicing object to develop my airbrushing skills and on the fly try to restore it as much as possible to its original state. This page is a report of that project
Start date: Oct 23, 2005
Finish date: Feb 22, 2006
|
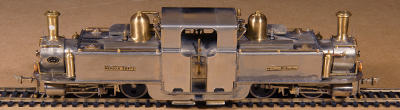
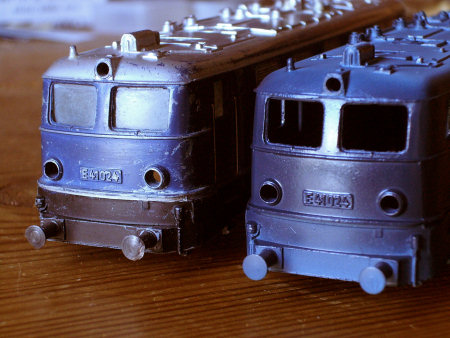
The original locomotive body as I received
it from my friend. He had removed all the paint |
|
Take a look at the remarkable detail of this die
cast body. It was almost too beautiful to paint! But I resisted the temptation not to. First the body got a thorough bath to degrease
it. I put it in rather warm water with concentrated dish washing soap
for half an hour. Then I cleaned it thoroughly with running warm water.
Then I submerged the body in a warm bath with acetate in it for another
half hour. During both cycles I scrubbed the body with a hard brush. |
 |
Then I picked up the airbrush and did the base
coat. I used Floquil primer. I was really happy with it |
 |
A close up. The primer makes a crisp relief on the body revealing every single unevenness |
 |
After a few days, allowing the base coat to dry, I set off to apply the first layer of blue. Finding the right color proved to be very difficult. Officially the E41 was fitted with RAL5011, Dark Sea Blue or Stahl Blau. In tables I found on the internet this should correspond with Revell 350, Tamiya XF17 or ModelMaster 1717. Choice enough, one should think. Well neither even approached the kind of blue the original color Märklin used. |
 |
The body after the first paint job |
 |
Then disaster struck. The Revell 350 paint just wouldn't settle straight. Instead of a nice smooth surface it had a grainy one. From a distance it looked okay, but taking a close look revealed this awkward grain effect. I decided to leave it and concentrate on the roof. Finding the right metal like gray as Märklin did, once again proved difficult. I bought several metallic, aluminum, iron, etc from Revell and ModelMaster and painted several test strips. At last I more or less desperately chose one metal
paint, taped the body and sprayed the roof. |
 |
I flung the body in a glass of thinner and left it there to rot for days. I removed the remains of the paint with a hard brush and started all over again.
|
 |
I reconsidered the blue paint. First a had to find color that wouldn't give that grainy effect. Second I had to find the right color, since all the Dark Sea Blue versions gave a more dark grayish green effect rather than a blue one. After long thought I decided to mix the paint myself. I bought a second body on a fair and bought the color nearest to the Märklin color. I bought a basic blue from ModelMaster that came close enough, 1772E "Blue Angel", and added quite some black, 1597E semi gloss black, until I had a color that though not completely yet closely matched the original. I also kept searching for a suited metal color and although it was on the shiny side I also found one, Humbrol 27001, metal aluminum. |


After the second attempt the body appeared in the beautiful
dark blue that I achieved and which didn't differ much from the original paint.
The aluminum. was too shiny but it was much better than the previous attempt.


On this photo all the painting had been done. The conduits on the roof and the
numbers on the side were done by hand with a very tiny brush. I used Revell
SM331 for the red color of the conduits. The finish was not applied yet.
Then as a last and finishing touch I sprayed the whole body with a semi gloss finish from Kleinspoor. This was a kind of gamble because it reputedly dissolves the softer paints like those from Humbrol. This could potentially destroy all the work in the finishing stage. So getting the first layer to dry fast was an absolute necessity
 |
 |
||
Before coating |
After coating |
||
| After drying there was a bit of a surprise for me: the shiny roof had dimmed quite a lot incidentally coming very, very close to the original color. I didn't count on this and it was simple luck that helped me. It is also a warning for future projects: you don't have the color right until you have applied the finish coat!! | |||
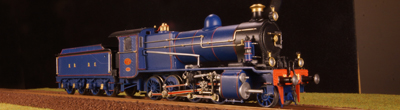
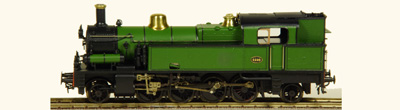
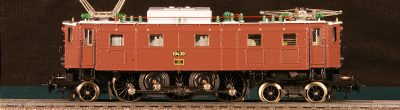
Finally two official portraits of the finished body


One last photo of the fully restored and assembled locomotive

Was it worth all the trouble, restoring a thirty year old locomotive that had already lost all its collectors value by the previous paint job?
- Well if you consider it from the collectors point of view: no. Although prices for a E41 in mint condition in original box may soar to 150 euro, the E41 is almost the most common Märklin locomotive, even today offered on eBay by dozens. Repainting the loco has completely destroyed it value.

- But from the owners point of view: yes. First there is the emotional value, it is after all the locomotive of your teenage years. Second this one time and unique E41 reappears in new, near original livery.
- And lastly from the painters point of view: I was totally inexperienced when I started the job and I have learned so many valuable lessons I would never have learned without the pressure of having to come up with at least a reasonable result.
So: YES!!

Sign my
GuestBook